

Lets build some drum pads!
*********************************************************************************************
This is Part 2 of 4 in the guide to Making Arduino Sampling Drum Pads
*********************************************************************************************
1. Make The Case
************************************************************************
Overview: First we cut the wood, glue it together, sand it down, drill a power supply hole, dust it, then paint it, paint it again, and again, sand it, then paint it again. Sounds fun?
Things we'll need:
Wood - read the section underneath for the exact type
Wood Glue
Saw
Mitre Box (aka 'wood angle cutting box')
Sanding paper - we'll use a fine grit (I used 600)
Our drum machine acrylic front panel as measurement (cut to 12x15cm)
MDF Board (cut to 12x15cm)
Wood making strap clamp
Wood stain
Drill, with hole cutting bit
Rectangular Wood Strip. Looks like this;


______________________________________________________
1.
First we need the wood, I'm using skirting board from a home supply/building store. It cost 6 euros-ish and can probably make 3 or 4 cases. Here's an image of it after it's been cut in half (I guess full size it measures about 3 meters long):
 |
| Wood you believe it? |
One side of the wood has been rounded by the store, which will give us a nice look once we've finished building it. The height of the wood is 5cm...

...and the width is 8mm;
 |
...Hopefully you should be able to find something similar where you live; they're pretty universal so I doubt you'll have any problems.
 |
| Wood in the store |
The only thing to keep an eye out for is that if the wood is warped. You really don't want warped wood as it's a nightmare to join together. Use your eyes and look down the whole length of the plank, hopefully it should be straight. You could also lay it down on the floor to check, but you'll lose that 'master woodsman' look.
Once you've found a flat piece of wood, you may want to inspect its grain;

You'll probably want a nice plain surface running through the whole board, as this will 'flow' more naturally when you join the corners. You don't want any areas where branches used to be, as it they're surprisingly tough to cut through, and can split when cutting. This might not be a problem if you have an electric cutter though.
________________________________________________
2.
We need to cut four pieces of wood like this;

Note: The lengths given (12cm & 15cm) are for the inside measurement, not the outside. Also note the angle of the cuts.
Using the mitre box, go cut the wood in a similar fashion. Depending on the thickness of your saw-blade, you may need to add 1 mm or 2 to the cut to get exactly 12cm.
Tip: Cutting a piece slightly too large is always better than too small.
 |
| Using the mitre box to cut angles |
 |
| Check that you're cutting the correct sides, you might have to make extra cuts to make it all fit |
 |
| Once finished, you should have something like this |
________________________________________________________________
3.
Now add the pieces into a slack wood strap clamp, face them so the rounded (top) sides are facedown against the desk. Add the acrylic front panel, this makes sure we get a really close fit:

Glue the edges;

Then tighten the wood clamp. You may need to reshuffle as you go, but you're looking for the best fit for the front panel. Make sure the clamp is tight (but not too tight to mark the wood), then let the glue dry thoroughly. If any glue comes out at the join, try and wipe it away if you can.
 |
| Wait for the glue to dry while the clamp is tightened |
____________________________________________________________
4.
With the front panel still in place, we can glue in 4cm long rectangular wood strips. Just glue the wood to the case, and not the acrylic panel:

Once complete it should look like this;

5.
You might want to mark in pencil which end is top on both the inside panel and wood.
Now we need to drill a hole for the usb cable to pass through & power the Arduino;

 |
| The finished box |
___________________________________________________
6.
While you still have the saw out, you can cut the back MDF panel to size (unless you had it pre-cut). It doesn't need to be as precise as the front panel, but should be about 12cm x 15cm (check for fit with your box).

____________________________________________________________
7.
Now we need to sand off any rough edges or overhanging glue. Use a fine grit for this, I used 600;

Go over every nook and cranny with the sandpaper and get the wood looking like it belongs together:
 |
| Smooth those edges |
Once complete, brush away any remaining dust, then wipe down with a lightly damp rag. We don't want any dust ruining our paint that we'll apply next.
_______________________________________________________
8.
I'll be using this chestnut wood stain which has lacquer already added:

Use a brush or sponge to evenly paint each side.
Try & finish painting a panel side without the stain drying, otherwise you may get an uneven coat. Finish one side with one coat before moving onto another side.
The more layers you add the darker the wood will be stained.
Tip: Depending on the wood, your first layer may turn an odd green colour, don't worry, the more layers you add the better it'll look.
I probably added 3 layers, and then evened it out with sandpaper, then added a final layer.

Great, that should be the case finished!
 |
| The finished case with the front panels added |
2. The Front Panel
************************************************************************
Overview: Lets drill the front panel then add some components. We'll also add a drinks coaster as the drum pad, and then hold it in place with some string.
What we'll need:
A drill, with drill bit sizes 1 - 10
Hot glue gun to glue the piezo pad down
Our front panel, acrylic, pre-cut to 12 x 15cm
Some string
Some string
A sewing pin that fits the string
Masking Tape
Round leather drinks coaster or similar (aka our drum pad)
LED holder
Audio Jack
Switch
Pitch Pot (B10K)
Audio pot (A100K)
Piezo sensor
_______________________________________________________
1.
TIP: When making the wooden case, you'll need to use the acrylic panel as a template, which is easier to do before you add any of the switches/pots/etc. Go make that first, or be prepared to remove these parts again.
HINT: Unless you have the exact same drinks coaster as me, you'll probably need slightly different measurements. It's easy to draw around the coaster with a pencil and work out the new dimensions.
Suggestion: The four corner screw holes might not be necessary if you're willing to hot glue gun these instead. Whenever drilling so close to the edge of acrylic it's very easy for it to snap, so you decide what's best.
Suggestion2: You might be able to skip the sewing part if you use something sticky..
You perhaps don't need to be as precise as the below measurements, but if you're like me and get really agitated at something being very slightly off center, then it's time to get out the ruler.
Here's where the parts will go. The 'X' marks where the drill holes will eventually go...

_______________________________________________________
2.
First measure out where the drill holes need to go, mark this with a pencil. You may find it easier to mask the front panel with tape, then make the markings. Also draw around your drinks coaster & piezo disk;

 |
| Your panel, or panels, should look a bit like this, only without the drill holes yet |
_______________________________________________________
3.
So now would be a good time to super glue into place the piezo disk to the panel, otherwise you'll have to add it after the you've sewn on the drinks coaster (a mistake I made as shown in the picture). Don't make that mistake, add it now.
Also drill the Piezo hole then thread the wire through to the back. The drill-bit hole size needed is '2';
 |
| Add the disk before adding the drinks coaster |
_______________________________________________________
4.
Now add the drinks coaster (aka drum-pad) and tape it down into place. Add the drill markings. It should look a little bit like this (although this photo already shows the drill holes added, but we'll do that in the next step);

_______________________________________________________
5.

Drill the holes using the provided drill sizes. Remember, be careful when working with acrylic panels (broken acrylic can be sharp) . It's also best to start with a small guide hole (say drill size 1), then gradually move up to the desired size;
Tip: Rest your drill bits. The small sizes in particular are prone to breaking when they get too hot... and if they break you might not be able to continue.

_______________________________________________________
6.

If the pin is too stiff to get through the hole, you can use some pliers to help convince it, just watch you don't snap the pin though;

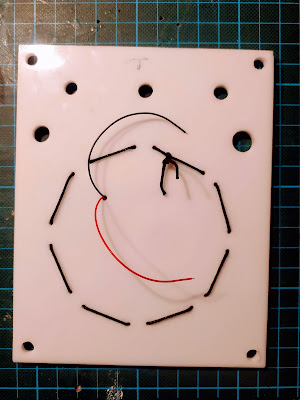
Pull through plenty of string between each hole, don't worry we'll tighten it later once we've finished. Work your way way around the pad until you get back to near where you started.
 |
| Loose string |
Once there, pull all the loose string through and make the pad sit nice and tight. Tie both the starting hole and end hole together using a double knot, and cut off the unneeded string
After removing the tape, your panel should now look a bit like this;

The back panel:
_______________________________________________________
7.
Now finish up by adding the pots, switch, LED holder & audio jack;

When finished it should look like this;

.
That should be the front panel finished and we're now ready to add the electronics to it. Yay!
No comments:
Post a Comment
Say something...